Set up an Email Server using Postfix, Dovecot and MySQL in Ubuntu 14.04 – Part 2

In the last blog post, we have set up the necessary tools for an email server to function and configured them. Now we need to test email delivery and check if the server is configured properly.  So before we test, we also need to setup an email client. In this case we will use Roundcube as discussed in the previous post.

  1. Roundcube

    • Configure Roundcube

      Enable https: In /etc/apache2/sites-available/default-ssl.conf

      SSLCertificateFile      /etc/ssl/certs/mailserver.pem
      
      SSLCertificateKeyFile   /etc/ssl/private/mailserver.key
      

      To add Roundcube configuration to apache:

      Include /etc/roundcube/apache.conf
      Alias   /  /var/lib/roundcube/
      

      Reload apache:

      service apache2 reload
      

      Add default server:

      vi /etc/roundcube/main.inc.php file and set:

      $rcmail_config['default_host'] = 'localhost';
      

      To permanently redirect http to https, in /etc/apache2/sites-available/000-default.conf add

      Redirect permanent / https://youripaddress/
      
    • Configure plugins:

      Config plugins in /etc/roundcube/main.inc.php

      $rcmail_config['plugins'] = array(   'archive',
         'managesieve',   'password', );
      

      Set the password configuration. The password query is used when updating the password through roundcube, adjusting to the table structure by posty API.

      $rcmail_config['password_minimum_length'] = 10; 
      $rcmail_config['password_db_dsn'] = 'mysql://mailuser:mailuserpass@127.0.0.1/emailserver'; $rcmail_config['password_query'] = "UPDATE users_view SET password=ENCRYPT (%p, CONCAT('$6$', SUBSTRING(SHA(RAND()), -16))) WHERE email=%u";
      
  2. Testing email delivery

    Testing local mail delivery using mail command:

    echo Hello | mail test@mailserverdemo.com
    

    You can now log in with Roundcube and check if the mail is delivered.

    You can also use telnet command to see if you can connect localhost using smtp.

    telnet localhost smtp
    

    Type ‘QUIT’ to exit

    Test if you can connect to gmail:

    telnet gmail-smtp-in.l.google.com. 25
    

    Likewise, you can test email delivery using roundcube by sending an email to your gmail account and vise versa.

    Note: You need to make sure your MX records are set up properly for email delivery outside your system. Usually port 25 will be blocked by your ISP so you may need to check your ports in case of non delivery

  3. Web administration using Posty Web UI

    Optionally you may want to use the posty API using a web UI. For this posty Web UI is also available from https://github.com/posty

    Download and install posty Web UI

    wget  wget -o posty_webui.zip https://github.com/posty/posty_webui/archive/master.zip
    unzip posty_webui.zip
    cp -r posty_webui /var/lib/
    cp posty_webui
    

    Adjust the configurations according to your needs in the settings.json like url and api keys

    vi settings.json
    

    Add confuration for posty web app:

    mkdir /etc/posty_webui
    vi /etc/posty_webui/apache.conf
    

    Add the following and save:

    Alias "/admin" "/var/lib/posty_webui"
    
    <Directory "/var/lib/posty_webui">
      DirectoryIndex index.html
      Order allow,deny
      Allow from all
      AllowOverride All
      Require all granted
    </Directory>
    

    Include the configuration in the main apache config:

    vi /etc/apache2/sites-enabled/default-ssl.conf
    

    Add the following after the line ‘Include /etc/phpmyadmin/apache.conf’

    		
    Include /etc/posty_webui/apache.conf
    

    Secure your API web administration with an admin password:

    Create your .htpasswd file using htpasswd command and file in the /etc/posty_webui/ directory

    You need to make some changes to the posty REST server if you are going to enforce secure connection. Since your web UI is served as secure http, when calling the posty API without https, your browser will block these connections. For this reason, instead of webrick as the default server, we can use thin server instead which provides secure http. To enable https, just install thin server:

    Change directory to your posty API folder:

    cd /home/ubuntu/posty_api_master/
    

    Add thin server to to the gem file.

    vi Gemfile
    

    Add the “gem ‘thin’, ‘~> 1.7.1′” to the list of gems, to install thin server:

    gem 'rack', ...
    gem 'thin', '~> 1.7.1'
    gem 'grape', ...
    

    Run bundle installer.

    bundle install
    

    Testing thin server:

    thin –help should give you a list of options to start the thin server.

    Run thin server with SSL enabled. You need to provide the signed certificate and key for using SSL:

    thin --ssl --ssl-key-file /etc/ssl/private/mailserver.pem --ssl-cert-file /etc/ssl/certs/mailserver.pem
    

    Configure your port, eg running on port 9292 with SSL:

    thin -p 9292 --ssl --ssl-key-file /etc/ssl/private/mailserver.pem --ssl-cert-file /etc/ssl/certs/mailserver.pem start
    

    You should see the console that looks like this:

    ...
    Using rack adapter
    Thin web server (v1.7.1 codename Muffin Mode)
    Maximum connections set to 1024
    Listening on 0.0.0.0:9292, CTRL+C to stop
    ...
    

    To run as a daemon sersvice:

    thin -d -p 9292 --ssl --ssl-key-file /etc/ssl/private/mailserver.pem --ssl-cert-file /etc/ssl/certs/mailserver.pem start
    

    Now you can login to your admin site in https://youripaddress/admin

  4. Add spam prevention:

    You can prevent a lot of spam by tightening incoming traffic to postfix and using RBL List for spam ip blacklists. Just add the following to /etc/postfix/main.cf. You may need add/remove parameters and adjust according to your needs:

    disable_vrfy_command = yes
    smtpd_delay_reject = yes
    smtpd_helo_required = yes
    smtpd_helo_restrictions =
      permit_mynetworks,
      reject_non_fqdn_hostname,
      reject_invalid_hostname
    smtpd_recipient_restrictions =
      permit_mynetworks,
      permit_sasl_authenticated,
      reject_non_fqdn_hostname,
      reject_non_fqdn_sender,
      reject_non_fqdn_recipient,
      reject_unauth_destination,
      reject_unauth_pipelining,
      reject_invalid_hostname
      reject_rbl_client bl.spamcop.net,
      reject_rbl_client cbl.abuseat.org,
      reject_rbl_client dnsbl.sorbs.net,
      reject_rbl_client zen.spamhaus.org
    smtpd_error_sleep_time = 1s
    smtpd_soft_error_limit = 10
    smtpd_hard_error_limit = 20
    
  5. Mail statistics using mail graph

    Mailgraph is a very useful tool for giving statistics of your email server, i.e it gives you the number of emails accepted or rejected and their average for a range like day, week, month and year.

    Installation is simple and straight forward. You need to also install rrd tool, a graph tool for using mailgraph. Install them using the following command:

    sudo apt-get install rrdtool mailgraph
    

    To configure mailgraph, you can use the following command:

    dpkg-reconfigure mailgraph
    

    Now we want to mailgraph to be accesible from your browser to see the statistics, so create a directory called ‘mailgraph’ inside your web server’s public directory and copy mailgraph from its location to the directory.

    mkdir /var/www/html/mailgraph
    cp -p /usr/lib/cgi-bin/mailgraph.cgi /var/www/html/mailgraph
    

    Add site configuration for mailgraph

    Alias "/mailgraph" "/var/www/html/mailgraph"
    
    <Directory /var/www/html/mailgraph/>
        AddHandler cgi-script .cgi .pl
        Options +ExecCGI
        Order allow,deny
        Allow from all
        AllowOverride All
        Require all granted
    </Directory>
    

    Add mailgraph to be served by apache server. In the apache configuration add the following:

    Include /etc/phpmyadmin/apache.conf
    Include /etc/posty_webui/apache.conf
    Include /etc/mailgraph/apache.conf
    Include /etc/roundcube/apache.conf
    Alias   / /var/lib/roundcube/
    

    Point you web browser to https://yourwebsiteaddress/mailgraph/mailgraph.cgi, to see the statistics:

  6. Logging:

    For trouble shooting, you can check your logs for errors. Depending on the distribution, the locations may be different. In our case, the following are the log locations for emails, roundcube and apache server.

    /var/log/syslog
    /var/log/mail.err
    /var/log/mail.log
    /var/log/roundcube/errors
    /var/log/apache2/error.log
    

Set up an Email Server using Postfix, Dovecot and MySQL in Ubuntu 14.04 – Part 1

This tutorial will guide you in setting up your own email server using Postfix, Dovecot and MySQL along with posty REST API for administration. In this tutorial we will configure it to use IMAP. However you can change the configurations to use POP3.

1. Overview Terms:

  • SMTP – Simple Mail Transfer Protocol
  • IMAP – Internet Message Access Protocol
  • IMAPS – IMAP Secure
  • POP3 – Post Office Protocol 3
  • POP3S – POP3 Secure
  • MTA – Mail Transfer Agent
  • LMTP – Local Mail Transfer Protocol

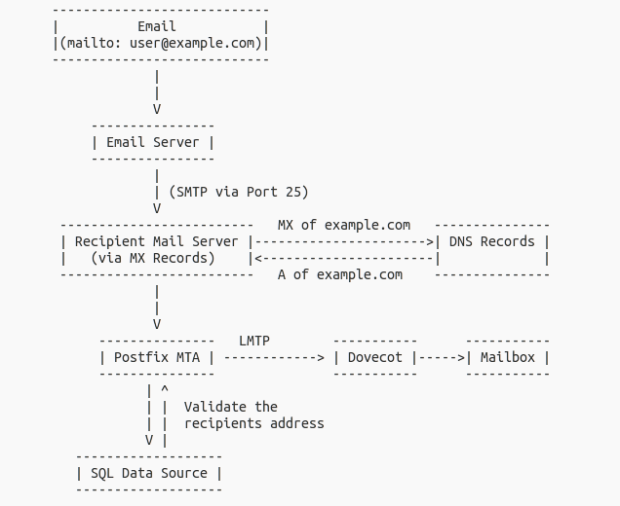
The following diagram shows a simple overview of how an email works:

email_overview

  • The sender sends an email to user@example.com using SMTP
  • The DNS Server finds the MX records for example.com and returns the corresponding server address to route the email
  • Postfix receives the mail on the receiving mail server
  • Postfix validates the address of the recipient by checking if it exists in the database and sends it to Dovecot
  • Dovecot LMTP processes the incoming mail
  • Dovecot apply filters and finally saves it to the corresponding mailbox

2. Ports

Before we begin with the installation, you might first want to check if all the required ports are open

  • SMTP
    • 25 and 465
    • 587 with SSL for outgoing mail
  • IMAP
    • 143
    • 993 with SSL

Checking firewall:

Use the following command to see which ports are listening:

sudo netstat -tulpn

You can also use nmap to check if any port is filtered in your network:

nmap youripaddress

3. Host Confguration

Edit hosts file:

vi /etc/hosts

127.0.0.1 localhost 127.0.1.1 yourserverhostname.maildomain.tld yourserverhostname.

Make sure to replace ‘yourserverhostname’ and ‘maildomain.tld’ with yours.

You can use ‘hostname’ command to check server hostname

For E.g:  127.0.0.1 localhost 127.0.1.1 email-server.mailserver.com email-server

4. SSL Certificates

For secure connections we need to set up the ssl certificates. To obtain one you can you use any of the CA services by any trusted Issuer.

Note: Before you choose an issuer make sure it is trusted all major browsers.

To generate a new certificate use the following command:

openssl req -newkey rsa:2048 -keyout mailserver.key -out mailserver.csr

Submit the csr file and get it signed by your cartificate authority. After receiving the signed certificate, you should have the following:

  1. root.pem
  2. intermediate_ca.pem
  3. mailserver.pem

Copy the certificate file to /etc/ssl/certs/mailserver.pem and key file to /etc/ssl/private/mailserver.key

5. Software required to install:

  • MySQL (version 5.6)For storing email users, domain and aliases.
  • Dovecot (version 2.2.9)An open source IMAP and POP3 email server for Linux/UNIX-like systems which also includes an LMTP server.
  • Postfix: (version 2.11.0)An open source MTA
  • PhpMyAdmin (Optional):For managing mysql databases
  • Roundcube:An open source webmail client.
  • Posty Rest APIhttp://www.posty-soft.org/

    Open source administration utility for mail servers based on postfix and dovecot.

6. Installation

Now we will install the required software packages:

  • Zip Utilities:

    sudo apt-get install zip unzip
  • MySQL Server:

    To install mysql use the following command:

    sudo apt-get install mysql-server
  • Postfix:

    During installation, you will be asked to configure some settings in the ‘Postfix Configuration’ dialog.

    Make sure you use the following settings: For ‘General type of mail configuration’ choose ‘internet site’ option

    For ‘System mail name’ enter

    yourserverhost.maildomain.tld, replacing ‘yourserverhost’ and ‘maildomain.tld’ with yours

    E.g: email-server.mailserver.com

    To install postfix use the following command:

    sudo apt-get install postfix postfix-mysql
  • Remove exim, the default mail server using the command below:
    sudo apt-get --purge remove 'exim4*'
  • Dovecot:

    Install dovecot using the following command:

    sudo apt-get install dovecot-mysql dovecot-imapd dovecot-managesieved dovecot-lmtpd
  • Roundcube:

    Install roundcube using the following command:

    sudo apt-get install roundcube roundcube-plugins
  • PhpMyAdmin:

    To install phpmyadmin use the command:

    sudo apt-get install phpmyadmin
  • Posty API:

    To install posty API, we need to install ruby on rails. Download the zip file and unzip the folder using the commands below:

    wget htps://github.com/posty/posty_api/archive/master.zip
    mv master.zip posty_api.zip
    unzip posty_api.zip
    • Set up ruby on rails:

      This will be used to set up the REST Server. For more information you can check it here. Use the following commands to set up ruby on rails:

      sudo apt-get install git-core curl zlib1g-dev build-essential libssl-dev libreadline-dev libyaml-dev libsqlite3-dev sqlite3 libxml2-dev libxslt1-dev libcurl4-openssl-dev python-software-properties libffi-dev nodejs
      sudo apt-get install libgdbm-dev libncurses5-dev automake libtool bison libffi-dev
      gpg --keyserver hkp://keys.gnupg.net --recv-keys 409B6B1796C275462A1703113804BB82D39DC0E3
      curl -sSL https://get.rvm.io | bash -s stable
      source /etc/profile.d/rvm.sh
      rvm install 2.3.0
      rvm use 2.3.0 --default
    • Install bundler

      gem install bundler

7. Configuration

  • MySQL:

    Create database for storing email credentials.

    
          CREATE DATABASE emailserver;


    Create mysql user for using the emailserver database.

    
          GRANT ALL ON emailserver.* TO 'mailuser'@'127.0.0.1' IDENTIFIED BY 'mailuserpass';
    
          
  • Apache Server:

    We need to configure SSL certificates for using secure http. For this edit the file /etc/apache2/sites-available/default-ssl.conf and change the lines below:

          SSLCertificateFile    /etc/ssl/certs/mailserver.pem
          SSLCertificateKeyFile /etc/ssl/private/mailserver.key
          

    Enable SSL encryption:

    a2enmod ssl

    Enable https:

    a2ensite default-ssl

    Restart the server:

    service apache2 reload

    Load your web page at https://youripaddress

  • PhpMyAdmin:

    Edit /etc/apache2/sites-available/default-ssl.conf include the following:

    
          Include /etc/phpmyadmin/apache.conf


    Reload apache

    service apache2 reload
  • Posty API:

    Change path to posty_api

    Before we proceed, we need to install mysqllib development library and then the required bundle:

    apt-get install libmysqlclient-dev
    bundle install --with mysql

    We will use schema generated by posty. For this we nned to copy config/database.mysql2.yml to config/database.yml and change mysql conncetion parameters.

    Create the tables using the following command:

    rake db:migrate

    This should generate the tables as follows:

          api_keys domain_aliases_view
          schema_migrations
          user_aliases_view
          users_view
          virtual_domain_aliases
          virtual_domains
          virtual_transports
          virtual_user_aliases
          virtual_users
          

    Generate api keys:

    rake api_key:generate

    This will return your api auth_token to be used when using the REST API. E.g

          d5a83739c8ade22bcb1f704849f50d6a
          

    This will be used to authenticate request using the REST
    API

    Start the rails app server:

    rackup

    Run as a daemon process:

    rackup -D

    Okay, lets test by creating some email accounts, virtual domains and aliases. These will be used later when configuring postfix in order to tell postfix to validate email accounts.

    Using the token generated above create a test virtual domain. Remeber to replace the ip address with yours.

          http://youripaddress:9292/api/v1/domains?auth_token=d5a83739c8ade22bcb1f704849f50d6a
          {"name": "mailserverdemo.com"}
          

    Create a test user

          http://youripaddress:9292/api/v1/domains/mailserverdemo.com/users?auth_token=d5a83739c8ade22bcb1f704849f50d6a
          {"name": "test", "password": "test", "quota": 250000}
          

    Create a domain alias

          http://youripaddress:9292/api/v1/domains/mailserverdemo.com/aliases?auth_token=d5a83739c8ade22bcb1f704849f50d6a
          {"name": "mailserverdemoalias.com"}
          

    Create a user alias

          http://youripaddress:9292/api/v1/domains/mailserverdemo.com/users/lamteiwahlang/aliases?auth_token=d5a83739c8ade22bcb1f704849f50d6a
          {"name": "demo"}
          
  • Postfix:

    Postfix has two main configuration files, located in

    /etc/postfix/main.cf and

    /etc/postfix/master.cf

    You can read more about the settings in http://www.postfix.org/BASIC_CONFIGURATION_README.html

    In order for Postfix to work with SQL, we need to create configuration files to mapping each setting to a file.

    virtual_mailbox_domains virtual_mailbox_maps virtual_alias_domains virtual_alias_maps

    1. Virtual Mailbox Domains (virtual_mailbox_domains)

      Create a new configuration for virtual mail box domain using mysql in /etc/postfix/mysql-virtual-mailbox-domains.cf

                user = mailuser
                password = mailuserpass
                hosts = 127.0.0.1
                dbname = emailserver
                query = SELECT 1 FROM virtual_domains WHERE name='%s'
                

      Add mapping for virtual_mailbox_domains to main.cf using the command below:

      postconf virtual_mailbox_domains=mysql:/etc/postfix/mysql-virtual-mailbox-domains.cf

      Test if the mapping works:

      postmap -q mailserverdemo.com mysql:/etc/postfix/mysql-virtual-mailbox-domains.cf

      Should return 1 if mapping was successful

    2. Virtual User Mailbox Maps (virtual_mailbox_maps)

      vi /etc/postfix/mysql-virtual-mailbox-maps.cf

                user = mailuser
                password = mailuserpass
                hosts = 127.0.0.1
                dbname = emailserver
                query = SELECT 1 FROM users_view WHERE email='%s'
                

      Add mapping for virtual mailbox to main.cf using the command below:

      postconf virtual_mailbox_maps=mysql:/etc/postfix/mysql-virtual-mailbox-maps.cf

      Test the mapping:

      postmap -q test@mailserverdemo.com mysql:/etc/postfix/mysql-virtual-mailbox-maps.cf

      Should return 1 if mapping was successful

    3. Virtual Domain Alias Maps (virtual_alias_domains)

      vi /etc/postfix/mysql-virtual-domain-aliases.cf

                user = mailuser
                password = mailuserpass
                hosts = 127.0.0.1
                dbname = emailserver
                query = SELECT destination FROM domain_aliases_view WHERE source='%s'
                

      Add mapping for virtual_alias_domains to main.cf using the command below:

      postconf virtual_alias_domains=mysql:/etc/postfix/mysql-virtual-domain-aliases.cf

      Test the mapping:

      postmap -q @mailserverdemoalias.com mysql:/etc/postfix/mysql-virtual-domain-aliases.cf

      Should return @mailserverdemo.com if mapping was successful

    4. Virtual User Alias Map (virtual_alias_maps)

      vi /etc/postfix/mysql-virtual-user-aliases.cf

                user = mailuser
                password = mailuserpass
                hosts = 127.0.0.1
                dbname = emailserver
                query = SELECT destination FROM user_aliases_view WHERE source='%s'
                
      postconf virtual_alias_maps=mysql:/etc/postfix/mysql-virtual-user-aliases.cf

      Add mapping for virtual_alias_maps to main.cf using the command below:

      postmap -q demo@mailserverdemo.com mysql:/etc/postfix/mysql-virtual-user-aliases.cf

      Should return test@mailserverdemo.com

    5. Catch-all aliases

      To forward all email addresses in a domain to an email address:

      vi /etc/postfix/mysql-email2email.cf

                user = mailuser
                password = mailuserpass
                hosts = 127.0.0.1
                dbname = emailserver
                query = SELECT email FROM users_view WHERE email='%s'
                
      postmap -q test@mailserverdemo.com mysql:/etc/postfix/mysql-email2email.cf

      test@mailserverdemo.com

      Map both catch-all and virtual aliases for a user:

      postconf virtual_alias_maps=mysql:/etc/postfix/mysql-virtual-user-aliases.cf, mysql:/etc/postfix/mysql-email2email.cf
    6. Configure Postfix to use Dovecot’s LMTP for email delivery:

      postconf virtual_transport=lmtp:unix:private/dovecot-lmtp
    7. Make Postfix use Dovecot for authentication:

      Enables TLS for authentication.

      postconf smtpd_sasl_type=dovecot
      postconf smtpd_sasl_path=private/auth
      postconf smtpd_sasl_auth_enable=yes
      postconf smtpd_tls_security_level=may
      postconf smtpd_tls_auth_only=yes
      postconf smtpd_tls_cert_file=/etc/ssl/certs/mailserver.pem
      postconf smtpd_tls_key_file=/etc/ssl/private/mailserver.key
      postconf 'smtpd_tls_mandatory_protocols=!SSLv2,!SSLv3'

      The last one is ensure that SSL2 and SSL3 are not used in order to prevent Poodle attack.

    8. Set permissions for Postfix:

      chgrp postfix /etc/postfix/mysql-*.cf
      chmod 644 /etc/postfix/mysql-*.cf
  • Dovecot:

    Create a new system user that will own all virtual mailboxes

    groupadd -g 5000 vmail
    useradd -g vmail -u 5000 vmail -d /var/vmail -m
    chown -R vmail.vmail /var/vmail

    Dovecot configurations can be found in /etc/dovecot/ and /etc/dovecot/conf.d directries.

    1. 10-auth.conf

      Tell dovecot to use MySQL database backend for authentication So uncomment !include auth-sql.conf.ext

                #!include auth-system.conf.ext
                !include auth-sql.conf.ext
                #!include auth-ldap.conf.ext 

      Edit auth-sql.conf.ext and change the following:

      Password database lookups

      We need to tell dovecot to use the SQL connection in dovecot-sql.conf.ext to look up for the password which will return a field named “password”

                passdb {
                    driver = sql args = /etc/dovecot/dovecot-sql.conf.ext
                }
                

      We can choose to use static UID and GID with a looking template for userdb lookup, this will be more faster since we don’t need to use SQL quries.

                userdb {
                    driver = static args = uid=vmail gid=vmail home=/var/vmail/%d/%n
                }
                
    2. 10-mail.conf

      Change the mail_location setting to:

                mail_location = maildir:/var/vmail/%d/%n/Maildir
                

      This is the directory for storing emails. Here %d will be the name of the domain, and %n the name of the user.

      Change the separator

                separator = .
                

      Here we use . as separator for backward compatibility

    3. 10-master.conf

      Change ‘service auth’ to make Postfix authenticate using Dovecot:

                # Postfix smtp-auth
                unix_listener /var/spool/postfix/private/auth {
                    mode = 0660 user = postfix group = postfix
                }
                

      This will allow communication with Postfix we tell Dovecot to use the communication socket file in that chroot area.

    4. 10-ssl.conf

      Point ssl certificate and key to their path

                ssl_cert = /etc/ssl/certs/mailserver.pem
                ssl_key = /etc/ssl/private/mailserver.key
                

      Enable TLS/SSL encryption by setting:

                ssl = yes
                
    5. 15-mailboxes.conf

                mailbox Junk {
                    auto = subscribe
                    special_use = \Junk
                }
                mailbox Trash {
                    auto = subscribe
                    special_use = \Trash
                }
                
    6. Tell dovecot to use mysql database using the connection parameters in /etc/dovecot/dovecot-sql.conf.ext

                driver = mysql
                connect = host=127.0.0.1
                dbname=emailserver
                user=mailuser
                password=mailuserpass
                default_pass_scheme = SHA512-CRYPT
                password_query = SELECT email as user, password FROM users_view WHERE email='%u';
                
    7. Set permissions for Dovecot:

      chown root:root /etc/dovecot/dovecot-sql.conf.ext
      chmod 644 /etc/dovecot/dovecot-sql.conf.ext
    8. Configure Dovecot to receive emails from Postfix:

      Edit Dovecot’s configuration file that deals with the LMTP daemon.

      You can find it at /etc/dovecot/conf.d/10-master.conf.In “service lmtp” section change it, so it looks like below:

                service lmtp {
                    unix_listener /var/spool/postfix/private/dovecot-lmtp {
                        group = postfix mode = 0600 user = postfix
                    }
                }
                

      Enable ssl and their ports in service imap-login

                inet_listener imap {
                    port = 143
                }
                inet_listener imaps {
                    port = 993
                    ssl = yes
                }
                

      Setting port to 0 will disable the protocol

    9. Enable mail plugins in 10-mail.conf:

      
                mail_plugins = $mail_plugins quota


      Edit the file /etc/dovecot/conf.d/20-lmtp.conf and within the “protocol lmtp” section change the “mail_plugins” line to:

      
                mail_plugins = $mail_plugins sieve


      Edit 20-imap.conf

      
                mail_plugins = $mail_plugins imap_quota


Next Steps: So far we have only installed and configured Postfix, Dovecot and MySQL to get them to work together. In the next part we will test both incoming and outgoing email delivery using ‘mail’ command and Roundcube. We will also see how to use posty API for administration.

Interoperable 128-bit AES Encryption

    Advanced Encryption Standard (AES) is the most widely used symmetric encryption algorithm. It is considered to be secure and efficient. It comes with different types encryption modes for block ciphering, including ECB, CBC, OFB, CFB and CTR. ECB is not considered to be secure compared to the others because it uses the same key for encrypting different blocks of data which would always result into the same cipher for the same plain text block, hence leaving it vulnerable to replay attacks. On the other hand CBC mode is more secure since each block of cipher will be XORed with the previous block of cipher.

    We will be discussing AES encryption using Cipher Block Chaining (CBC) mode. It includes an Initialisation Vector (IV) which along with the secret key, will be used in the encryption. The first block of plain text in encrypted using the key and the IV.  Subsequent blocks will be XORed with the previous cipher block. However, in order to have a truly secure encryption, the IV should ensure randomness so that every time the encryption is performed, IV is always unique so that the first block of cipher will always be unique. The same IV should be used for encryption and decryption.

    Here, we will see how to encrypt and decrypt data so that it will be inter-operable in 4 different languages, i.e Java, PHP, Python and Node.js. If you would prefer plain Javascript in your web page, all you need is to include crypto-js from here.

    We will be using AES encryption with 128 bits using CBC mode. The length of key is 16 bytes (128 / 8). The result of the IV should be in hexadecimal format, although while processing it is represented in bytes. The generation of IV is dependent on the language you use but most languages will interface methods for a random number generator (RND) provided by the system.

    Here we will see how to encrypt and decrypt using Java, Python and Node.js such that if encrypted in one language, it should yield the same plain text when decrypted in another language, provided that you use the same initialisation vector for encryption and decryption. Below is the source code for Java. You can find the source code for other  languages in my github account here.

Java

import java.security.AlgorithmParameters;
import java.security.InvalidKeyException;
import java.security.MessageDigest;
import java.security.NoSuchAlgorithmException;
import java.security.SecureRandom;
import java.util.Arrays;
import java.util.Random;

import javax.crypto.BadPaddingException;
import javax.crypto.Cipher;
import javax.crypto.IllegalBlockSizeException;
import javax.crypto.NoSuchPaddingException;
import javax.crypto.spec.IvParameterSpec;
import javax.crypto.spec.SecretKeySpec;
import javax.xml.bind.DatatypeConverter;

public class EncryptionDemo {

  private static int KEY_SIZE = 16;
  private static String ENCRYPTION_KEY = "thisisasamplepassphraseforencoding";

  public static void main(String[] args) {
    String plaintext = "Hello World!";
    System.out.println("Plain text: " + plaintext);
    try {
      // Ensure that the key is no more than 16-bytes long
      String passphrase = (ENCRYPTION_KEY.length() &amp;gt; KEY_SIZE) ? ENCRYPTION_KEY.substring(0, KEY_SIZE) : ENCRYPTION_KEY;
      byte[] key = passphrase.getBytes("UTF-8");

      // Generate initialization vector
      byte[] iv = generateInitializationVector(KEY_SIZE);
      System.out.println("IV: " + new String(iv, "UTF-8"));

      // Encrypt plain text
      String ciphertext = encrypt(plaintext.getBytes("UTF-8"), key, iv);
      System.out.println("Encrypted text: " + ciphertext);

      // Decrypt cipher text
      String decryptedtext = decrypt(ciphertext, key, iv);
      System.out.println("Decrypted text: " + decryptedtext);
    } catch (Exception e) {
      System.out.println("An exception occurred while encrypting plain text in main(): " + e);
    }
 }

  /**
  * Encrypt using AES 128-bit encryption with CBC mode
  *
  * @param plaintext (byte[]) The plain text
  * @param key (byte[]) The secret key
  * @param iv (byte) the initializatoin vector
  *
  * @return (String) Encrypted text
  */
  private static String encrypt(byte[] plaintext, byte[] key, byte[] iv) {
    try {
      SecretKeySpec secretKeySpec;
      secretKeySpec = new SecretKeySpec(key, "AES");

      // PKCS#5 Padding
      Cipher cipher = Cipher.getInstance("AES/CBC/PKCS5Padding");
      AlgorithmParameters algorithmParams = AlgorithmParameters.getInstance("AES");
      algorithmParams.init(new IvParameterSpec(iv));
      cipher.init(Cipher.ENCRYPT_MODE, secretKeySpec, algorithmParams);
      byte[] encryptedBytes = cipher.doFinal(plaintext);
      return DatatypeConverter.printBase64Binary(encryptedBytes);
    } catch (NoSuchPaddingException | BadPaddingException e) {
      System.out.println("Padding exception in encrypt(): " + e);
    } catch ( NoSuchAlgorithmException | InvalidKeyException | IllegalBlockSizeException e ) {
      System.out.println("Validation exception in encrypt(): " + e);
    } catch (Exception e) {
      System.out.println("Exception in encrypt(): " + e);
    }
    return null;
  }

  /**
  * Decrypt using AES 128-bit encryption with CBC mode
  *
  * @param ciphertext (byte[]) The cipher text
  * @param key (byte[]) The secret key
  * @param iv (byte) the initializatoin vector
  *
  * @return (String) Plain text
  */
  public static String decrypt(String ciphertext, byte[] key, byte[] iv ) {
    try {
      SecretKeySpec secretKeySpec;
      secretKeySpec = new SecretKeySpec(key, "AES");
      Cipher cipher = Cipher.getInstance("AES/CBC/PKCS5Padding");
      AlgorithmParameters algorithmParams = AlgorithmParameters.getInstance("AES");
      algorithmParams.init(new IvParameterSpec(iv));
      cipher.init(Cipher.DECRYPT_MODE, secretKeySpec, algorithmParams);
      return new String(cipher.doFinal(DatatypeConverter.parseBase64Binary(ciphertext)), "UTF-8");
    } catch (NoSuchPaddingException | BadPaddingException e) {
      System.out.println("Padding exception in decrypt(): " + e);
    } catch ( NoSuchAlgorithmException | InvalidKeyException | IllegalBlockSizeException e ) {
      System.out.println("Decryption exception in decrypt(): " + e);
    } catch (Exception e) {
      System.out.println("Exception in decrypt(): " + e);
    }
    return null;
  }

  /**
  * Utility function to generate initialization vector
  *
  * @return bytes
  */
  private static byte[] generateInitializationVector(int len) {
    try {
      char[] CHAR_ARRAY = "ABCDEFGHIJKLMNOPQRSTUVWXYZabcdefghijklmnopqrstuvwxyz0123456879".toCharArray();
      SecureRandom srand = new SecureRandom();
      Random rand = new Random();
      StringBuilder sb = new StringBuilder();
      for (int i = 0; i &amp;lt; len; ++i) {
      if ((i % 10) == 0) {
        rand.setSeed(srand.nextLong());
      }
      sb.append(Integer.toHexString(rand.nextInt(CHAR_ARRAY.length)));
    }
    return sb.toString().substring(0, KEY_SIZE).getBytes("UTF-8");
    } catch (Exception e) {
      System.out.println("Error generating Initialization Vector: " + e);
    }
    return null;
  }
}

Some common Javascript pitfalls

Javascript being both a dynamic and loosely typed language, gives you a lot of flexibility in our code implementation. With that said, if you are not careful, you might find yourself in one of the following pitfalls:

1) Undefined variables, unexpected values!

As usual if you declare variables using var, they will be in the scope in which they were declared. These variables are declared and can be assigned some value or null value. However unless you are in strict mode, undeclared variables will by default be in the global scope.

var x = 1;
function test(){
  var x = 2;
  y = 3;
  console.log('Calling x in test():' + x);
  console.log('Calling y in test():' + y);
}
console.log('x: ' + x);
test();
y = 4;
console.log('y: ' + y);

Output:
x: 1
Calling x in test():2
Calling y in test():3
y: 4

As you can see y has changed, although it was called outside the scope of the function test(). Now you know what to expect. As a rule of thumb you should always use typeof if you are unsure about the variable. For e.g:

function test(x, y){
  console.log('typeof x: ' + typeof(x) + ', typeof y: ' + typeof(y));
}
test(1, 'abc');
test(2);

Output:
typeof x: number, typeof y: string
typeof x: number, typeof y: undefined

2) Defining everything in the global scope

Its a good practice to define your variables and objects within a namespace. Let see with an example.

var person = {
  'name': 'John',
  'age': 25
}

Now you will that the person object is defined in the global scope as follows:

window.person

Object {name: “John”, age: 25}

What happens if you had included another javascript script which defines another person object globally after your script, lets say the object was declared like this:

var person = {
  'ssn': 1234,
  'name': 'Dave',
  'age': 30,
  'company': 'ABC'
}

Now call

window.person

You will find that your object has been overriden with the new object.
Object {ssn: 1234, name: “Dave”, age: 30, company: “ABC”}

Sometimes you may want to define your objects in the global namespace, lets say you created your own plugin. In this case you wrap everything within an object and only expose functions/variables that should be accessed globally.

3) Weird sorting order?

Try sorting the following array:

var num_arr = [3, 4, 1, 12, 7, 13, 24];
num_arr.sort();
console.log(num_arr);

You will get the follwing result:
[1, 12, 13, 24, 3, 4, 7];

The reason being that java script does lexical sorting. Hence you see that 12, 13 and 24 comes before 3.

You can change the sorting function using the following code;

sort(function(a, b){
  return a - b;
});

This will tell the sort method to compare which argument comes first. Putting the sort function above should give you the sorted array in ascending order as follows:
[1, 3, 4, 7, 12, 13, 24]

4) Callbacks and asynchronous Javascript

Lets say you want to make an asynchronous function call and on depending on completion you want to continue to the next statement as follows:

function asyncFunc(param){
  setTimeout(function(){
    console.log('Sleep for ' + param + ' seconds');
  }, param * 1000);
}
asyncFunc(3);
console.log('Call completed');

When you execute the function above you will see the statement following the function gets executed immediately:

Call completed
Sleep for 3 seconds

You can see that the asynchronous function is executed without blocking the other statements and therefore any statement following it will be executed immediately.

But in this case we want to execute the next statement only upon completion of the function call to asyncFunc.
So we use a callback function which is simply a function executed after the current function has completed.
We change the code above as follows:

function asyncFunc(param, callback){
  setTimeout(function(){
    console.log('Sleep for ' + param + ' seconds');
    callback();
  }, param * 1000);
}
function callback(){
  console.log('Call completed');
}
asyncFunc(3, callback);

which gives the following output:
Sleep for 3 seconds
Call completed

I hope this post helps you. Happy coding 🙂

Install Ejabberd XMPP Server in Ubuntu 16.04

In this tutorial we are using the 64 bit deb package

Step 1: Download ejabberd

Download the deb package from https://www.process-one.net/en/ejabberd/downloads/

OR alternatively, use wget to download

wget https://www.process-one.net/downloads/downloads-action.php?file=/ejabberd/17.01/ejabberd_17.01-0_amd64.deb

Now rename the package as follows:

mv downloads-action.php?file=%2Fejabberd%2F17.01%2Fejabberd_17.01-0_amd64.deb ejabberd_17.01-0_amd64.deb

Step 2: Backup ejabberd

If you are doing a fresh install, you can jump to Step 3. If you are upgrading ejabberd, take a backup of your database using the following command:

/opt/ejabberd-xx.xx/bin/ejabberdctl backup ejabberd.backup

where xx.xx is your current ejabberd version.

  • Make a copy of the backup file and the conf folder. They will be located in /opt/ejabberd-xx.xx/database/ and /opt/ejabberd-xx.xx/conf respectively.
  • Stop ejabberd node

When upgrading, also check the upgrade process from https://docs.ejabberd.im/admin/upgrade/
Note: Make sure you have the necessary backups before installing the new version.

Step 3: Install ejabberd

Install ejabberd using the following command:

dpkg -i ejabberd_17.01-0_amd64.deb

Ejabberd will be installed in the /opt folder, so change your directory to this folder.

cd /opt/ejabberd-17.01

To check if installation was successful, you should have the following folders
bin, conf, database, doc, lib and logs.

Step 4: Installing SSL Certificates

If you are using a server for production, you will need to install SSL certificates.

  • Generating a Certificate Signing Request with key. This will generate two files, the csr file and the server key. Using openssl command, you can generate the two files. This will prompt you to enter information that will be incorporated into your certificate request.
    openssl req -nodes -newkey rsa:2048 -keyout server.key -out server.csr
  • Submit your CSR file to a any CA. You use any CA for this.
  • After you receive the certificates from your CA, you need to create a pem file for ejabberd. You will have to follow concatenate according to the following order:
    1. Your domain certificate
    2. The ca certificate
    3. Your private key file

    We do this using cat command as follows, in the order mentioned above:

    cat yourdomain.crt > server.pem
    cat ca_intermediate.crt >> server.pem
    cat server.key >> server.pem
    
  • Copy the server.pem file to ejabberd conf folder

Step 5: Edit the configuration file

Configure your server using a text editor. Some of the configurations are pre-configured, however you will need to make some changes which are relevant to your requirements.

Lets configure our server:

vi /opt/ejabberd-17.01/conf/ejabberd.yml

a) Configure hosts (domain names served by ejabberd not to be confused with the ejabberd node name)
hosts:

...
  - "yourhostname"
...

b) Configure your admin user, For e.g, In the ACL section, you configure your admin user

...
admin:
  user:
    - "admin@yourhostname"
...

For a complete list of configurations, check the documentation at https://docs.ejabberd.im/admin/configuration/

Step 6: Start the server

Start ejabberd using the following command:

/opt/ejabberd-17.01/bin/ejabberdctl start

You can check the status of ejabberd using the following command:

/opt/ejabberd-17.01/bin/ejabberdctl/ejabberdctl status

Step 7: Add users

Now that you have configured your server, you will need to add some users to the server.
For e.g, we will create the admin user, using the following command:

/opt/ejabberd-17.01/bin/ejabberdctl register admin yourhostname adminpassword

replacing yourhostname and adminpassword with yours

Step 8: Open web console

Open web admin console in browser
http://yourip:5280/admin/
or
https://yourip:5281/admin/

Note: For https you will also need to configure the listener in the configuration file.

Enter your credentials using username admin@yourhostname and the password you entered while creating the admin user

If everything went fine, you should see the web console. If your server does not start you can check the logs in the log folder within the ejabberd installation folder.

You can use the following command to check if you have any errors while starting the server.

ejabberdctl debug

P.S:
If you opt for a different database other than mnesia
Follow the steps in https://docs.ejabberd.im/admin/guide/databases/mysql/

A note on XMPP communications protocol

    When it comes to messaging, I’ve been interested to know how messaging protocols work such as XMPP (Extensible Messaging and Presence Protocol) communications protocol, which is an open standard for messaging that provides a set of protocols for message exchange based on XML. Applications such as WhatsApp, GoogleTalk and Facebook external chat API to name a few, uses the XMPP protocol (or a customized version of the protocol). While the standards are open, these protocols themselves are complicated and heavyweight with a lot of overhead because of the extensive use of XML. Some application servers such as Ejabberd, Openfire, Tigase, Prosody have implemented these protocols for messaging. Based on the protocols (XEPs) implemented by these XMPP servers, client software/ IM applications can use these protocols for connecting with the servers. You can compare the list of messaging protocols here. When choosing a protocol, many factors come into play. But since more of the messaging happens in real-time, we want to minimize overhead and maintain a steady connection. Scalability, concurrency and reliability plays important roles. Due to this, some of the applications such as GTalk has moved on and replaced by Google Hangouts which uses its own protocols for messaging. However, it is interesting to learn how these protocols work providing insights in handling messages, presence, roster, group sharing, etc. We also have a list of client software and libraries which we can use to connect to the XMPP server. In the next series of posts, I will walk through setting up your own XMPP (Jabber) server and use libraries such as Smack API a Java library for both Android and Java backend and JavaScript libraries such as Strophejs for connecting to your Jabber server. Personally I’ve never used Tigase or Prosody, but when it comes to performance I highly recommend using Ejabberd.

Java Socket Programming – Part II

In the second part, we need to have a server component that listens to client connections. This is a very basic demonstration of how clients connect to servers in the client-server architecture. In real world applications, we need to implement threads that listens to connections. Here is the code for the server side that runs in a single thread. We need to start the server component first so that it can receive client connections. If you change the port number, make sure you use the same port number for both modules.

/**
 * Socket programming  using  Java
 * Server component
 */

import java.io.*;
import java.net.*;
import java.util.*;

public class ServerDemo {
  public static void main( String args[] ) throws IOException {

    // open a port for connection
    short portnumber = 7777;   // assuming your own port
    int byteSize = 0, bufferSize = 0, filesize = 1048576; //max size - 1Mb

    FileInputStream fin = null;

    // define the server object
    ServerSocket serverSocket = null;
    try {
      serverSocket = new ServerSocket( portnumber );
      System.out.println("Waiting...");
      serverSocket.setSoTimeout(20000);   // set connection timeout
    } catch ( IOException e ) {
      System.exit(1);
    }

    // define client socket object
    Socket clientSocket = null;
    try {
      clientSocket = serverSocket.accept();
    } catch (SocketTimeoutException e) {
      System.out.println("Connection timed out!");
      System.exit(1);
    } catch ( IOException e ) {
      System.out.println("I/O error " + e);
      System.exit(1);
    }

    if (serverSocket != null ) {
      System.out.println("Connected to " + clientSocket.getInetAddress() + " on port "
        + clientSocket.getPort() + ", local port  " + clientSocket.getLocalPort());
      System.out.println("Waiting for request from " + clientSocket. getInetAddress());

      //create a new file to store incoming bytes
      byte [] buffer = null;
      InputStream in = null;
      String newfile = null;
      try {
        buffer  = new byte [filesize];
        in = clientSocket.getInputStream();
      } catch ( Exception e ) {
        System.out.println(e.getMessage());
      }      

      //open file stream for writing the contents of the file
      FileOutputStream fout = null;
      BufferedOutputStream bos = null;
      try{
        fout = new FileOutputStream("_temp~1.txt");
        byteSize = in.read( buffer, 0, buffer.length );
        bufferSize = byteSize;
      } catch ( Exception e ) {
        System.out.println(e.getMessage());
      }
      do {
        try {
          byteSize = in.read(buffer, bufferSize, ( buffer.length-bufferSize ));
          if(byteSize >= 0) {
            bufferSize += byteSize;
          }
        } catch (Exception e) {
          System.out.println("Error: Cannot receive file!");
          System.exit(1);
        }
      } while(byteSize > -1);

      try {
        bos = new BufferedOutputStream(fout);
        bos.write(buffer, 0, bufferSize);
        bos.flush();
        System.out.println("File received from " + clientSocket.getInetAddress());
        bos.close();
        fin = new FileInputStream("_temp~1.txt");

        //prompt for reading file
        String userInput = null;
        BufferedReader input = new BufferedReader( new InputStreamReader( System.in ));
        System.out.print("Do you want to display the contents of the file ? [y/n] : ");
        userInput = input.readLine();
        int i;
        if (userInput.equalsIgnoreCase("y")) {
          System.out.println();
          do {
            i = fin.read();
            if(i != -1) System.out.print((char) i);
          } while(i != -1); // read until end of file
        }
        in.close();
        fin.close();

        //prompt for saving file
        System.out.print("Do you want to save the file ? [y/n] : ");
        userInput = input.readLine();
        File f = null;
        f = new File("_temp~1.txt");
        if (userInput.equalsIgnoreCase("y")) {
          BufferedReader fileBr = new BufferedReader( new InputStreamReader ( System.in ));
          System.out.print("Specify a filename: ");
          newfile = fileBr.readLine();
          Boolean b = f.renameTo(new File(newfile));
          if( b )
            System.out.println("File successfully saved as \"" + newfile + "\"");
          else
            System.out.println("An error occured while saving file!");
        } else
          f.delete();
        in.close();
      } catch ( Exception e ) {
        System.out.println("Error : Could not save file!");
      } finally {
        serverSocket.close();
      }
    }
  }
}


Java Socket Programming – Part 1

Here is a simple socket programming which allows a client to be connected to a server using Java. Lets create a simple file transfer from a client machine to the server.

  1. First make a connection with the server
  2. If the connection was successful, open a text file (in the client’s machine)
  3. Send the file to the server

The following code will be used for client

/**
 * Socket programming  using  Java
 * A client to server connection
 */

import java.io.*;
import java.net.*;

public class ClientDemo {
  public static void main( String args[] ) throws IOException {

    // open a port for connection
    short portnumber = 7777; // assuming your own port
    String hostname, fileName;
    OutputStream os = null;

    // get hostname or ip address of the server
    BufferedReader host = new BufferedReader( new InputStreamReader ( System.in ));
    System.out.print(&quot;Enter the server name: &quot;);
    hostname = host.readLine();

    // define client socket object
    Socket clientSocket = null;
    try {
      clientSocket = new Socket( hostname, portnumber );
      System.out.println(&quot;Connecting to &quot; + hostname + &quot; on port &quot; + portnumber + &quot;...&quot;);
    } catch ( UnknownHostException e ) {
      System.out.println(&quot;Unknown server : &quot; + e.getMessage());
      System.exit(1);
    } catch ( IOException e ) {
      System.out.println(e.getMessage());
    }

    // send file to server
    if (clientSocket != null ) {
      System.out.println(&quot;Connection accepted&quot;);
      BufferedReader fileBr = new BufferedReader( new InputStreamReader ( System.in ));

      // open file for transfer
      System.out.print(&quot;Enter the name of the text file you want to sent: &quot;);
      fileName = fileBr.readLine();
      File myTextFile = new File (fileName);

      // open file stream for sending bytes of data
      byte [] buffer  = new byte [(int)myTextFile.length()];
      try {
        FileInputStream fin = new FileInputStream(myTextFile);
        BufferedInputStream bin = new BufferedInputStream(fin);
        bin.read( buffer, 0, buffer.length);
        os = clientSocket.getOutputStream();
        System.out.println(&quot;Sending...&quot;);
        os.write(buffer, 0, buffer.length);
        os.flush();
        System.out.println(&quot;File was send sucessfully!&quot;);
      } catch ( IOException e ) {
        System.out.println(&quot;File not found!&quot;);
      } finally {
        clientSocket.close();
      }
    } else {
      System.out.println(&quot;Connection failed!&quot;);
      System.exit(1);
    }
  }
}

Welcome

Welcome to my personal blog. I like to share my thoughts and experiences in varied topics ranging from programming, music, life, poetry, nature, etc. If you find something useful, share the love and spread the word. Cheers!